Important: Always consult your physician before starting an exercise program
A common pitfall, even among people who are otherwise strong and fit, is to neglect the lower back and the other muscles that support and stabilize the spine. I know, because I was one of those people, and I paid for it.
In my late twenties, I was in the best shape I’d ever been in. My body fat was around 8%, and I was proud of the fact that while my chest was measuring at 43 inches, my waist had shrunk to a mere 32 inches. I was routinely completing 5-mile runs in well under 40 minutes, and could bench press about 250 lbs., well in excess of my body weight of 175 lbs. I was also on top of my game when playing goal in my Monday-night deck hockey league. I often wore shirts that were sleeveless and/or just a little snug, all the better to show off my arms and chest, and I relished every chance I got to go to the beach, where I could show off my physique with no shirt at all. I had worked hard to get in the shape I was in, I reasoned, so hadn’t I earned the right to flaunt it just a bit? All in all, I was feeling pretty good about myself, and like many young fitness enthusiasts, I had begun to think of myself as being bulletproof.
But that illusion came crashing down as I was performing a heavy barbell deadlift. I had performed this exercise many times as part of my strength–training routine without incident, but this time was different. As I was completing a repetition I suddenly felt a sharp pain shoot up my lower spine, and I realized much to my frustration that I had to stop. I assumed that I would need some rest and ice, and perhaps some ibuprofen, and that I would be up and running in about a week. Instead, I had chronic back pain for weeks that eventually turned into months, and I grew frustrated and a little worried. Once it became painfully clear that my back pain wasn’t going to go away by itself, I finally went to see my primary care physician. He told me something that surprised me: While the rest of my muscles, including those of my upper back, were well developed, the muscles in my lower back lagged woefully behind. This became a bigger issue as I began to train with heavier weights, because the muscles in my core simply weren’t strong enough to keep my spine in alignment. As it turned out, my back injury wasn’t a freak occurrence; it was a time bomb waiting to go off.
My problem was that my idea of training my core muscles was to do crunches, and perhaps a few side bends. These are great exercises from an aesthetic standpoint, because they strengthen and define the surface muscles that give a well-trained set of abs their “six-pack” look. But they don’t address the muscles that lie deeper in the core, which are more important from a functional standpoint because they’re responsible for maintaining stability in the spine. I first learned about this concept when my doctor sent me to work with a physical therapist. The exercises she prescribed worked wonders: The pain in my lower back diminished, and eventually disappeared entirely. I’ve been doing those exercises faithfully ever since and have picked up some new ones through my own research and education.
Here are six exercises that will help ensure that you don’t experience a similar lower-back injury.:
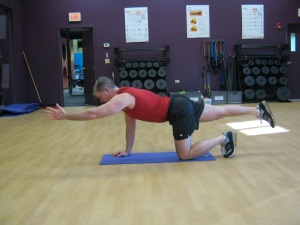
1. Prone Pointer
The prone pointer specifically targets the muscles in your lower back. Begin on your hands and knees, with your hands and thighs situated directly under the shoulders and hips, respectively. Be sure to avoid locking the elbows by keeping them soft (slightly bent). Contract your abdominal muscles, and draw your navel in towards your spine. Lift one arm straight out in front of you, and then lift the opposing leg, creating a straight line from your fingers to your toes. Lengthen as much as you can through your fingers and toes while keeping the elbow and knee soft. Keep your gaze on the floor. The key to this exercise is to maintain the contraction in your abdominal and lower back muscles in order to keep a neutral alignment in the pelvis and lower spine. Be sure not to allow the pelvis to tilt forward, which will cause the lower back to sag. Hold this position for a ten count, and then repeat the movement with the opposite arm and leg. Repeat 10 times on each side.
2. Bridge Pose
The bridge pose targets the muscles in your buttocks in addition to the lower back. It also strengthens the abdominal muscles and aids with digestion. Lie flat on your back with your knees bent and feet pressed flat into the ground. Knees and feet should be shoulder width apart. Contract your abs, lower back, and buttocks, and press into the ground with your heels to lift the hips until your body is forming a straight line from your shoulders to your knees. Hold this position for a ten count, and then gently lower the hips to the floor, resting briefly before pressing the hips up again. Repeat 10 times.

3. Shoulder Pinch with Resistance Tubing
The shoulder pinch strengthens and stabilizes the upper as well as the lower back, and is excellent for improving posture. Wrap a piece of resistance tubing around a closed door handle and hold on to the ends with each hand. Contract the abdominal and lower back muscles, and pull the resistance tubing towards your body, bending your elbows to 90 degrees and pinching your shoulder blades together. Count to 10 as you hold this position, and then gently release tension in the band by bringing your arms forward again while maintaining stability in the core. Repeat 10 times.
Note: As you become more proficient at this exercise, you should be able to hold the contraction for longer counts: 20 seconds, 30 seconds, a minute or even longer. Whereas holding for 10 seconds at a time was challenging for me when I first began to do this exercise, I can now hold through a 5-minute song without stopping.


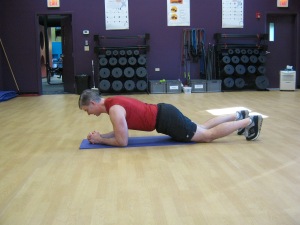
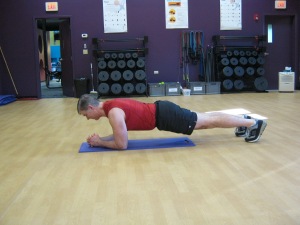
4. Front Plank
The front plank is an excellent strengthener for a deep core muscle called the transverse abdominus. Begin by lying flat on your stomach with your forearms on the ground and your upper arms snug against your rib cage. Contract the abs and pull the navel in towards the spine, leaving a gap between your abs and the ground. Then press the elbows and knees into the ground to lift your hips until your body forms a straight line from your shoulders to your knees. Use the muscles in your abs and lower back to maintain a neutral position with your pelvis and lower back. Avoid allowing the pelvis to tilt forward, which would allow the lower back to sag, placing unnecessary stress on the lower vertebra. Hold for a count of 10, and gently lower yourself to the ground, resting briefly before you lift your hips again. Repeat 10 times.
Note: as your core muscles get stronger, you may do a more advanced version of this exercise by lifting your knees and performing this exercise on your toes. You may also begin to hold this pose for longer counts in order to present your core with a greater challenge.
5. Double Leg Extension
The double leg extension is another great exercise for the transverse abdominus. Lying flat on your back, lift your knees above your hips. Drawing your navel in towards your spine, slowly extend your legs up, as though you’re trying to make a set of footprints on the ceiling. From there, slowly lower the legs until you feel tension in the deep core muscles, but it is critical to maintain a neutral curve in the spine in order not to place undue stress in the vertebra in the lower back. If you feel your spine arching up and away from the ground, slowly raise your legs again until you reach a point where you can keep the spine under control. If you’re a beginner, you may want to perform this exercise with your hands placed under your lower back until you begin to gain more body awareness. Hold for a count of 10 and return to the starting position, giving yourself a brief rest between repetitions. Repeat 10 times.

6. Side Plank
This is a great exercise for strengthening and stabilizing your internal and external obliques. Begin on your side with your hips on the ground, your knees bent to 90 degrees, and your elbow placed directly below your shoulder. Press down with your elbow and knees to lift your hips off the ground until your body forms a straight line from your knees all the way to your shoulders. Hold for a count of 10. Gently lower your hips back to the ground to give yourself a rest between repetitions. Repeat 10 times.


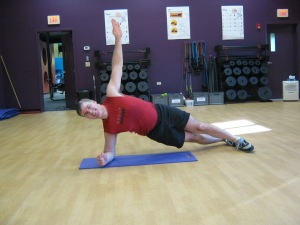

As you become stronger, you may choose a more advanced version of this exercise by extending the top leg. A yet more advanced version would be to extend both legs, stacking one on top of the other. Holding for longer counts is another way to continue becoming more proficient at this exercise.
Andy Sullivan is an AFAA-certified personal trainer and group exercise instructor in Group Power, Group Centergy, Cardio Kickboxing, Boot Camp Challenge and Spinning. Once a sedentary, overweight smoker, Andy used a combination of exercise and healthier eating habits to transform both his mind and his body. His mission is to inspire others to do the same, working with clients in Massachusetts and southern New Hampshire. As a highly sensitive person (HSP), Andy uses an approach that is empathetic, caring, and patient in addition to being motivational, which works exceptionally well with HSP clients.
In addition to fitness, Andy’s other interests include sports (especially hockey and baseball), singing, playing guitar, reading, and writing. Helives in Shirley, Massachusetts, with his wife of 14 years, Cathy.
